VPN on Mac step by step guide (Using L2TP/IPsec VPN) | FREE INTERNET
VPN on Mac step by step guide (Using L2TP/IPsec VPN)
Here is an instruction how to connect to a VPN Gate Public VPN Relay Server by using L2TP/IPsec VPN Client which is built-in on Mac OS X.
On this instruction, every screen-shots are taken on Mac OS X Mountain Lion. Other versions of Mac OS X are similar to be configured, however there might be minor different on UIs.
These screen-shots are in English version of Mac OS X. If you use other language, you can still configure it easily by referring the following instructions.
1. Initial configurations (only once at the first time)
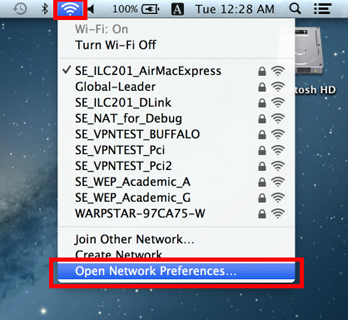
Click the network icon on the top-right side on the Mac screen. Click "Open Network Preferences..." in the menu.
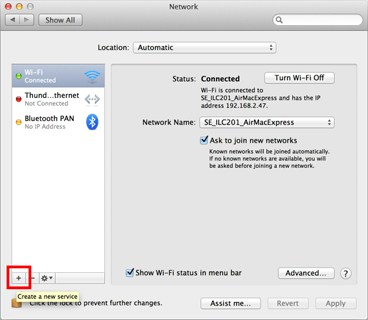
Click the "+" button on the network configuration screen.
Select "VPN" as "Interface" , "L2TP over IPsec" as "VPN Type" and click the "Create" button.
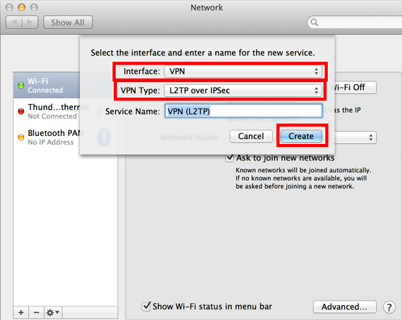
A new L2TP VPN configuration will be created, and the configuration screen will appear.
On this screen, you have to specify either hostname or IP address of the destination VPN Gate Public VPN Relay Server.
Open the VPN Servers List page, and click one VPN Relay Server which you want to use. Copy the DDNS Hostname (an identifier ends with ".opengw.net" ) or IP Address (digits as xxx.xxx.xxx.xxx) and paste it on the "Server Address" field on the configuration screen.
- In general, DDNS Hostname (an identifier ends with ".opengw.net" ) are recommended to specify. DDNS hostname can continue to be used even if the corresponding IP address of the DDNS hostname will change in future. However, in some countries or regions, you might be unable to use DDNS hostname. If you fails to specify a DDNS hostname, try IP Address (digits as xxx.xxx.xxx.xxx) specification instead.
After you specified the "Server Address" , input "vpn" (3-letters) on the "Account Name" field, which is the next to the "Server Address" field.
Next, click the "Authentication Settings..." button.

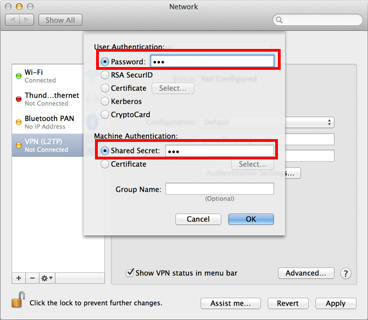
The authentication screen will appear. Input "vpn" (3-letters) to the "Password" field. Specify "vpn" (3-letters) also on the "Shared Secret" field. After you input them, click the "OK" button.
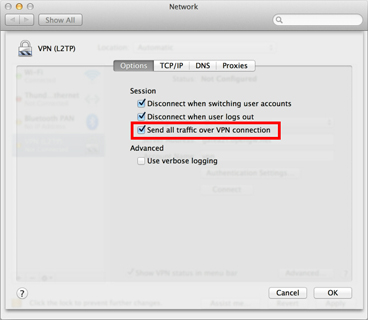
After return to the previous screen, check the "Show VPN status in menu bar" and click the "Advanced..." button.
The advanced settings will be appeared. Check the "Send all traffic over VPN connection" and click the "OK" button.
On the VPN connection settings screen, click the "Connect" button to start the VPN connection.
2. Start a VPN connection
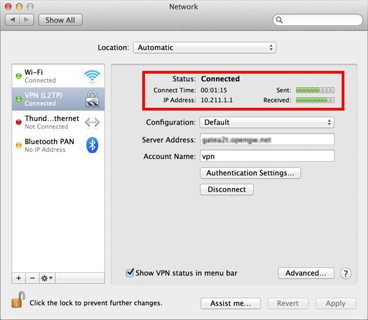
You can start a new VPN connection by clicking the "Connect" button at any time. You can also initiate a VPN connection by clicking the VPN icon on the menu bar.
After the VPN connection will be established, the VPN connection setting screen will become as below as the "Status" will be "Connected" . Your private IP address on the VPN, and connect duration time will be displayed on the screen.
3. Enjoy Internet via VPN relaying
While VPN is established, all communications towards the Internet will be relayed via the VPN Server.
You can visit the VPN Gate Top Page to see your current global IP address. You can see your source country or region has been changed to other if you are connecting to a VPN server which is located on oversea country.
You can visit the VPN Gate Top Page to see your current global IP address. You can see your source country or region has been changed to other if you are connecting to a VPN server which is located on oversea country.
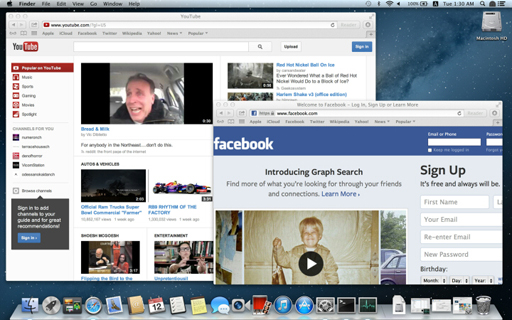
Enjoy YouTube, Facebook or Twitter while your VPN connection is established.
Facebook, Twitter and Gmail uses HTTPS (SSL) encrypted communication protocols. Regardless of VPN or non-VPN, no one can tap these encrypted communications.
Facebook, Twitter and Gmail uses HTTPS (SSL) encrypted communication protocols. Regardless of VPN or non-VPN, no one can tap these encrypted communications.
Any errors using L2TP/IPsec VPN?
- Username, password and pre-shared key are all "vpn" (3-letters). Especially, make sure you input the pre-shared key correctly.
- Mac OS X and Android needs a special settings to make the VPN server relays all traffics. Confirm the above instructions again.
- Make sure that the destination hostname or IP address are correct, viewing the VPN Servers List page.
- In some countries or regions, specifying DDNS Hostname (.opengw.net) might fail. In such an environment, specify the IP address directly instead of DDNS hostname.
- Your local firewall might filter any L2TP/IPsec packets. In such a network, L2TP cannot be used. If you use Windows, try Using SoftEther VPN Client. Mac, iOS or Android, try Using OpenVPN.
Credits to: http://www.vpngate.net/
VPN on Mac step by step guide (Using L2TP/IPsec VPN) | FREE INTERNET
![VPN on Mac step by step guide (Using L2TP/IPsec VPN) | FREE INTERNET]() Reviewed by Bright Idea Hub
on
4:39 AM
Rating:
Reviewed by Bright Idea Hub
on
4:39 AM
Rating:

No comments: